


Last updated: October 2026 Written by the LiftKitGuide Team, truck suspension installers and editors
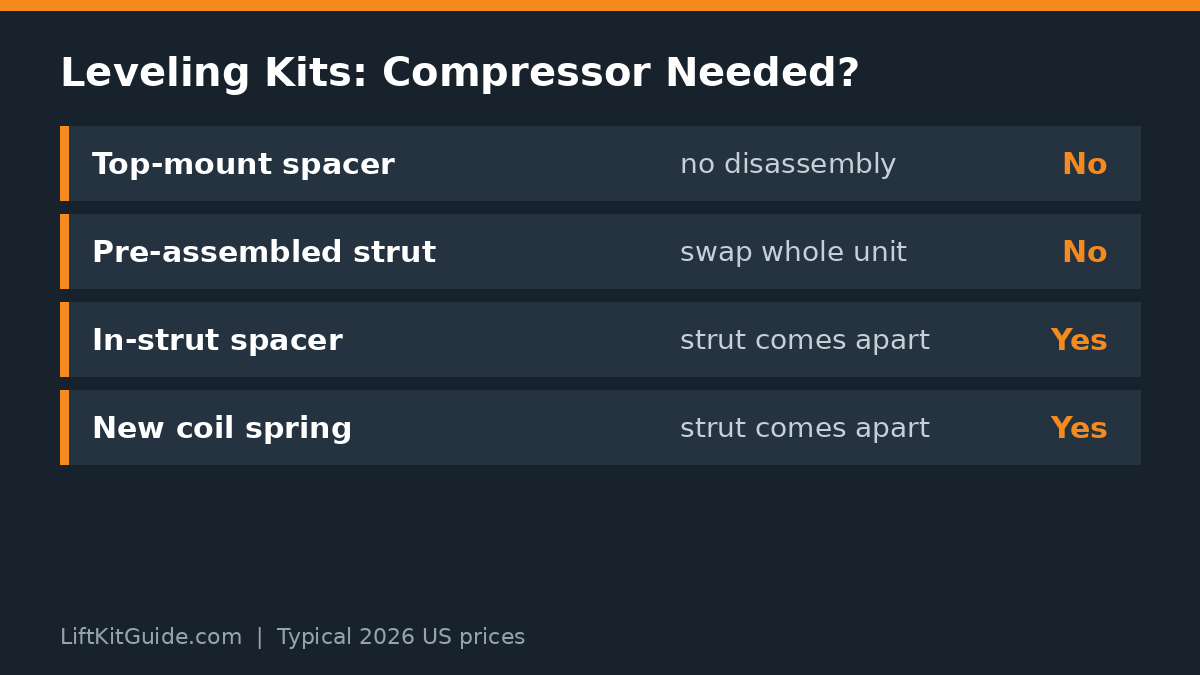
Yes — can you install a leveling kit without a spring compressor is a question with a happy answer for most truck owners: top-mount strut spacers bolt onto the assembled strut with no disassembly, so no compressor is needed. These kits install in about 60 to 90 minutes per side with basic hand tools. You only need a spring compressor when the kit places the spacer inside the strut or replaces the coil spring itself, which requires taking the strut apart.
Key takeaways
- Top-mount strut spacers install with no strut disassembly — no spring compressor required.
- Typical install time for a no-compressor leveling kit is 60 to 90 minutes per side with hand tools.
- In-strut spacers and replacement coil springs DO require a compressor; check your kit type before starting.
- Spring compressor rental is free with a ~$60 refundable deposit at most auto parts stores.
- Pre-assembled leveling struts ($400–$900 per pair) eliminate the compressor question entirely.
On this page
Can you install a leveling kit without a spring compressor?
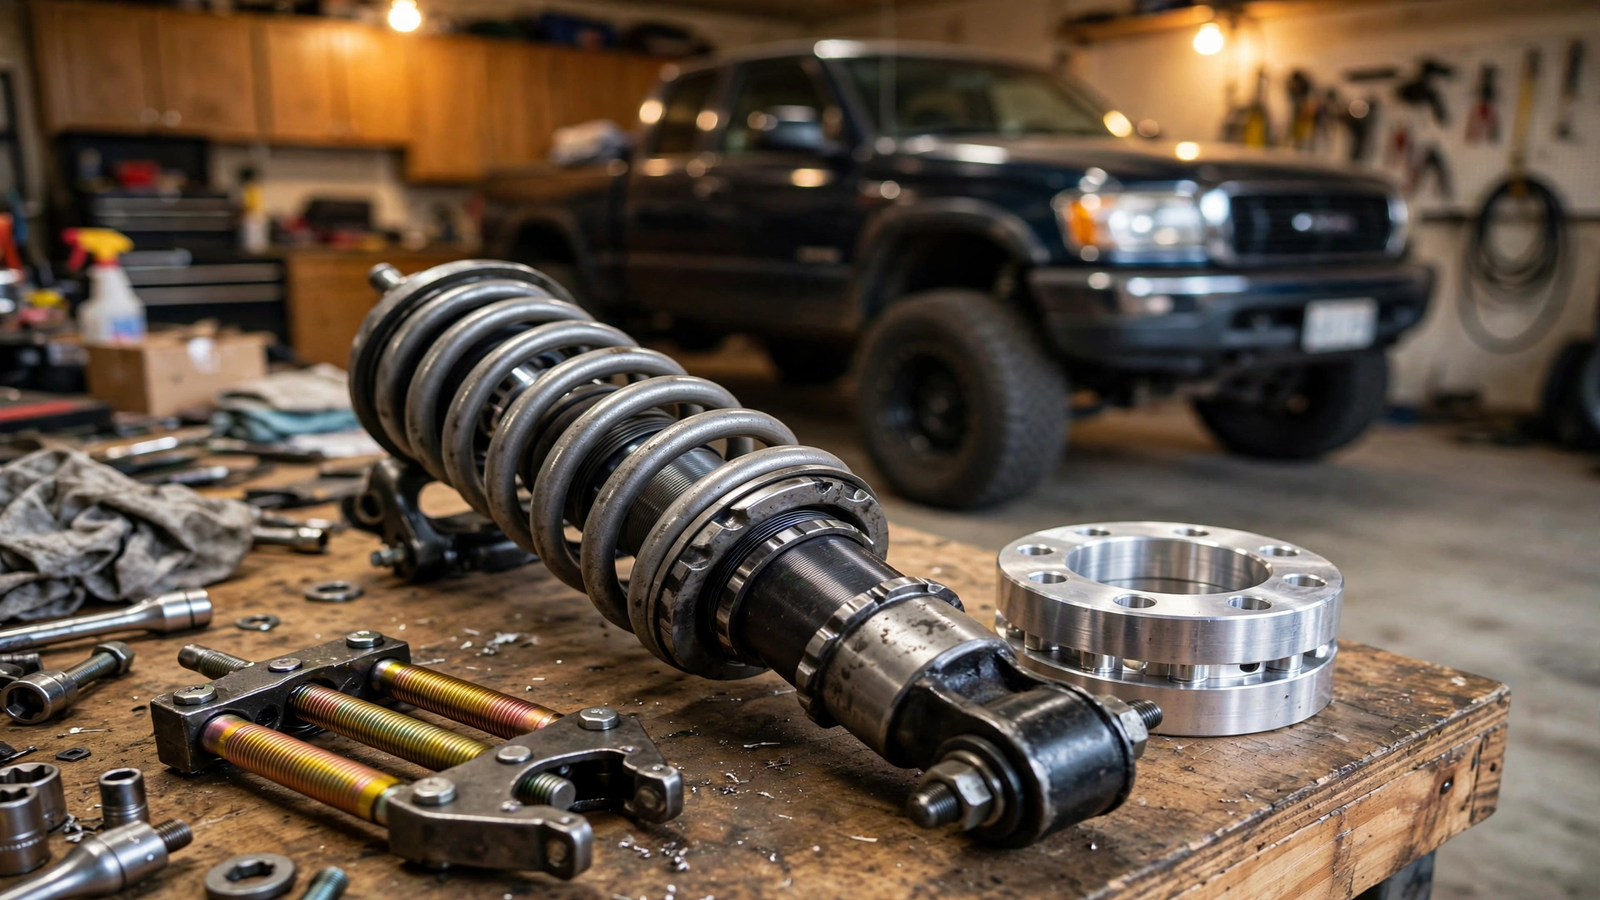
The short answer to can you install a leveling kit without a spring compressor is yes, provided you buy the right kit. Top-mount strut spacers are the most common leveling kit design for modern IFS trucks, and they work by bolting a machined spacer between the top of the fully assembled strut and the frame mount. Because the strut never comes apart, the coil spring stays captured the entire time, and the dangerous stored energy that a compressor controls is never released.
This is why so many product listings advertise no compressor required as a headline feature. The install is straightforward: remove the wheel, unbolt the strut from the lower control arm and the upper mount, bolt the spacer to the top of the strut, and reinstall the assembly. Alignment afterward is still mandatory, since any ride-height change alters camber and toe. Our leveling kit explainer breaks down the spacer, strut, and torsion key designs so you can confirm which type you are buying. What does can you install a leveling kit without a spring compressor mean for your shopping list? Filter for top-mount designs and the answer stays yes.
The key caveat is that the answer to can you install a leveling kit without a spring compressor depends entirely on kit design, not on your skill or tools. Read the instructions before you order — if they mention disassembling the strut or compressing the spring, you need the compressor regardless of what a forum post promised.
Which leveling kit designs need no strut disassembly?
Three leveling kit designs install without touching the spring. Top-mount strut spacers are the big one — a plate or puck that bolts between the strut’s upper mount and the chassis. Lower strut mount spacers relocate the bottom of the strut. And complete replacement leveling struts (like Bilstein 5100 adjustable or Rancho QuickLift assemblies) swap the whole unit, so the old strut comes out in one piece and the new one goes in the same way. So can you install a leveling kit without a spring compressor with any of these three designs? Yes — that is exactly what they are engineered for. One example is the Skyjacker top-mount spacer kit, which explicitly advertises no strut compressor required.
These designs dominate the 1.5- to 2.5-inch leveling market for trucks like the F-150, Silverado, Ram 1500, Tacoma, and Tundra. Manufacturers specifically engineer them for driveway installation, which is why install times are quoted at 60 to 90 minutes per side. Steel or billet aluminum construction is the standard — avoid plastic or polyurethane spacers for strut applications, as they cannot reliably handle the loads.
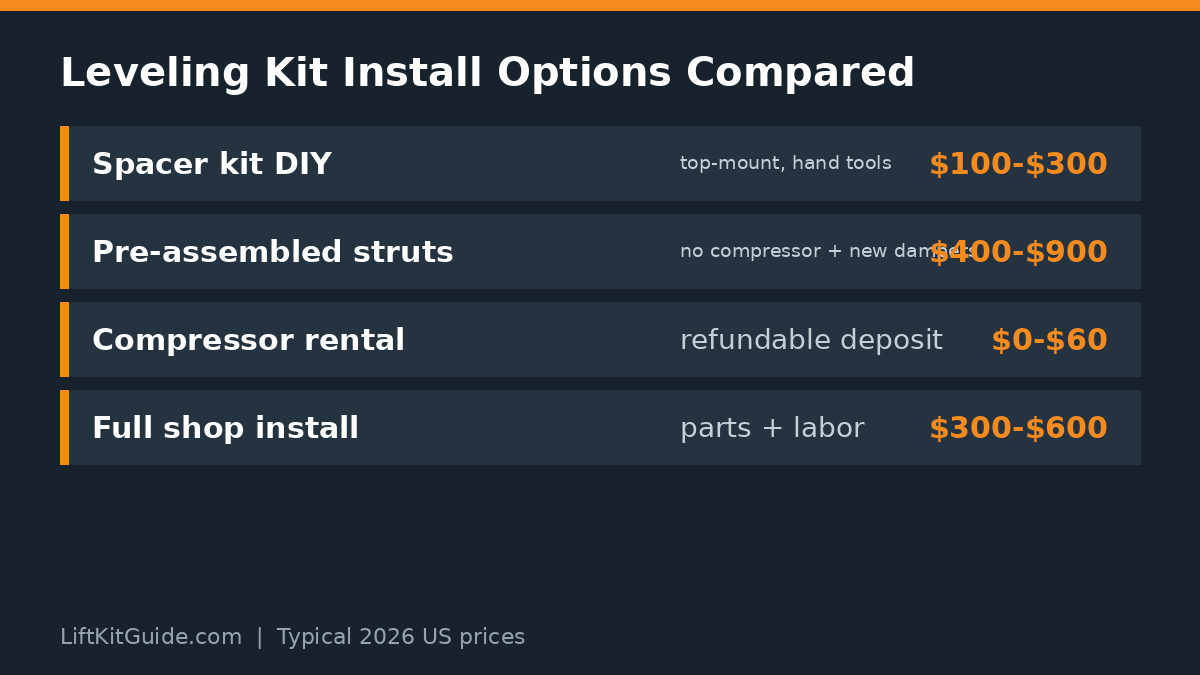
If you are shopping by price, our leveling kit cost guide compares spacer kits ($100–$300) against pre-assembled struts ($400–$900), so you can weigh the compressor question against your budget.
| Kit design | Spring compressor needed? | Typical install time |
|---|---|---|
| Top-mount strut spacer | No | 60–90 min per side |
| Lower strut mount spacer | No | 60–90 min per side |
| Pre-assembled leveling strut | No | 1–2 hours per side |
| In-strut (preload) spacer | Yes | 2–3 hours per side |
| Replacement coil spring | Yes | 2–3 hours per side |
How does a top-mount strut spacer install actually work?
A top-mount spacer install follows the same sequence on nearly every IFS truck. With the truck on jack stands and the wheel off, you disconnect the sway bar end link and ABS wire bracket for droop clearance, unbolt the strut from the lower control arm, and remove the three or four nuts holding the upper strut mount to the frame. The whole strut assembly drops out as one unit — spring still captured, no drama.
The spacer then bolts to the top of the strut using the supplied longer hardware, and the lengthened assembly goes back in: upper studs through the frame mount first, then the lower bolt through the control arm. Torque values matter here — one popular F-150 leveling kit specifies 66 ft-lbs on the lower strut bolt, 35 ft-lbs on the upper mount nuts (do not exceed), and 46 ft-lbs on the upper ball joint, with an explicit warning never to use an impact wrench on the strut hardware.
The reason no compressor is needed is pure mechanics: nothing in this sequence releases the spring. Compare that with a full suspension lift kit that replaces coilovers, where strut disassembly — and the compressor — is unavoidable.
Note the torque discipline these kits demand: because the spacer becomes part of the load path, every nut must hit its spec — typically around 35 ft-lbs on upper mount nuts with an explicit do-not-exceed warning, and 66 ft-lbs on lower strut bolts. Overtightening the upper nuts can distort the mount, while undertightening lets the assembly shift. A torque wrench is mandatory here even though the spring compressor is not, which surprises owners who assumed a simple spacer kit needed no precision tools.
When do you still need a spring compressor for a leveling kit?
You need a spring compressor whenever the kit requires opening the strut. In-strut (preload) spacers sit between the spring and the spring seat inside the assembly, which means the strut must be disassembled to install them. Replacement coil springs obviously require the same. Some 2WD coil-spring spacer kits (like older F-150 2WD designs) also need the spring compressed to fit the taller spacer into the spring pocket.
The rule of thumb: if the instructions say to remove the upper strut mount from the strut, the compressor is mandatory. There is no safe shortcut — pry bars, ratchet straps, and lowering the control arm slowly are all methods that have injured people. A compressed truck coil spring stores thousands of pounds of force, and a slipping improvised tool turns it into a projectile. The rule behind can you install a leveling kit without a spring compressor is simple: if the strut opens, you need the tool.
If your kit falls in this category, do not let it scare you off the project. The rental process is simple, and our install cost guide shows that even a compressor-required leveling kit is far cheaper DIY than the $300 to $600 a shop charges for the same job.
How does spring compressor rental work at auto parts stores?
Most major auto parts chains run a free tool loaner program that includes strut spring compressors. You pay a refundable deposit — typically around $60 — take the tool home, and get the full deposit back when you return it. The rental is effectively free as long as the tool comes back complete and undamaged, which makes it the obvious choice for a one-time leveling kit install.
Inspect the rental before you leave the store. Check that both compressor jaws move smoothly, the threads are clean and lubricated, and the safety pins or locks are present. Ask the counter staff to confirm it is the strut/coil type rated for truck springs, not a small MacPherson car unit. A quality rental compressor from a national chain is far safer than a bargain-bin unit bought online.
Plan the rental around your install day — most programs allow a 24- to 48-hour loan. If the job stretches across a weekend, confirm the return window so you are not paying for an extra day. And if you find yourself renting twice, buying a quality compressor for $80 to $150 starts making sense.
Rental programs typically give you 24 to 48 hours with the tool, which is plenty for a leveling kit — most owners finish both sides in an afternoon once the truck is on stands. Before you leave the store, have the counter staff confirm the compressor is the strut/coil type rated for truck springs rather than a small MacPherson car unit, and check that both jaws, threads, and safety locks are in good shape. If you are asking can you install a leveling kit without a spring compressor because you dread this step, remember the rental is free on return — the only cost is a trip to the store.
| Option | Cost | Best for |
|---|---|---|
| Parts store rental | ~$60 refundable deposit | One-time install |
| Buy quality compressor | $80–$150 | Multiple future jobs |
| Buy pre-assembled struts | $400–$900 per pair | Skipping the compressor entirely |
| Pay a shop for strut work | $150–$300 labor | Zero interest in spring work |
How do you use a spring compressor safely?
Safe compressor use starts with positioning: the jaws must grip the spring 180 degrees apart, on flat coils (not the tapered ends), with both sides tightened evenly a few turns at a time. Compress only as much as needed to free the upper mount — over-compressing stresses both the tool and the spring. Keep your body out of the spring’s line of fire the entire time, and wear safety glasses and gloves.
Never use an impact wrench on a spring compressor. The hammering action can shock-load the jaws and cause them to slip, and it gives you no feel for how evenly the spring is compressing. Hand-tighten with a ratchet or breaker bar, alternating sides, and stop immediately if a jaw shifts or the spring starts to tilt. If anything looks wrong, back the compressor off slowly and reposition.
Work with the strut secured — a bench vise or a strut held firmly on the ground, never balanced on a knee or held by a helper. Take photos of the mount orientation before disassembly so the strut goes back together clocked correctly. Rushing this step is how springs end up installed upside down or rotated, which changes ride height and handling.
One more safety note that experienced installers repeat: compress the spring in small, even increments and stop the moment anything looks crooked. A spring that starts tilting in the jaws is warning you before it fails — back the compressor off slowly, reposition the jaws on flat coils 180 degrees apart, and start again. Owners who ask can you install a leveling kit without a spring compressor are often really asking whether they can avoid this anxiety, and with a top-mount kit, they can.
Are pre-assembled leveling struts worth the extra money?
Pre-assembled leveling struts are the premium answer to the compressor question: the new strut arrives with the spring already installed and the lift built in, so you unbolt the old assembly and bolt in the new one. No compressor, no spring handling, no clocking worries. For owners who want zero spring work, they are absolutely worth considering.
The math is straightforward. A spacer kit costs $100 to $300 plus your time with basic tools. Pre-assembled struts run $400 to $900 per pair but include fresh dampers — which most trucks with 60,000-plus miles need anyway. If your factory struts are worn, the upgrade pays for itself in ride quality alone, and you skip the compressor rental entirely.
Brands like Bilstein (5100 series with snap-ring height adjustment), Rancho (QuickLift loaded assemblies), and Eibach all offer direct-fit options by truck. Factor in an alignment ($100–$150) either way. For a full comparison of approaches, see leveling kit vs lift kit to make sure a level is really all you want before spending strut money. Still weighing can you install a leveling kit without a spring compressor against just paying a shop? The spacer kit plus a free rental usually wins on cost.
- Spacer kit ($100–$300): cheapest path; no compressor needed for top-mount designs.
- Pre-assembled struts ($400–$900): no compressor, plus fresh dampers — best value on high-mileage trucks.
- Compressor rental (~$60 deposit): free on return; the budget route for in-strut kits.
- Shop strut swap ($150–$300 labor): carry the struts in and let a pro handle the spring work.
- Full shop install ($300–$600): zero tool investment, but the most expensive option.
Can you install a leveling kit without a spring compressor on any truck?
On most modern IFS trucks — F-150, Silverado/Sierra, Ram 1500, Tacoma, Tundra, 4Runner — the answer to can you install a leveling kit without a spring compressor is yes, because top-mount spacer kits exist for all of them. These are the highest-volume leveling applications in the US, and the aftermarket has optimized the install to be compressor-free. That is why can you install a leveling kit without a spring compressor is one of the most searched install questions — and for most trucks, the answer is yes.
Exceptions exist. Some heavy-duty trucks and older torsion-bar or coil-spring 2WD designs use spacers that sit inside the spring pocket and require compression. Solid-axle trucks (Super Duty, Ram 2500/3500) use coil spacers that typically drop in without a compressor since the coil is not captured in a strut — jack up the frame, let the axle droop, and the spring practically falls out.
The universal rule: match the kit to your comfort level before buying. If you never want to touch a spring compressor, filter for top-mount or pre-assembled designs and verify no-compressor-required in the instructions. And budget the full project honestly with our cost to lift a truck guide so the kit, alignment, and any tools fit the plan.
Frequently asked questions
Do all leveling kits require a spring compressor?
No — top-mount spacers and pre-assembled struts need no compressor. Only in-strut spacers and new coil springs require one.
How long does a no-compressor leveling kit take to install?
About 60–90 minutes per side with hand tools; roughly 2–3 hours total for both sides.
Is it safe to install a leveling kit without a spring compressor?
Yes — it is the safer route since the spring stays captured in the strut and its stored energy is never released.
Can I rent a spring compressor for free?
Effectively yes — a ~$60 refundable deposit at most parts stores, fully refunded on return.
Do I need an alignment after a leveling kit install?
Yes, always — any ride-height change alters alignment angles. Budget $100–$150 for a professional alignment.
What is the easiest leveling kit to install yourself?
A top-mount strut spacer kit — no disassembly, no compressor, basic tools, 60–90 minutes per side.
The bottom line
So can you install a leveling kit without a spring compressor? For the vast majority of truck owners buying a top-mount spacer kit or pre-assembled struts, the answer is a confident yes. The strut stays assembled, the spring stays captured, and the job needs nothing more exotic than sockets, a jack, stands, and a torque wrench.
Just buy the right kit for your comfort level. If the instructions mention compressing the spring, believe them and rent the compressor — it is free with a deposit. Either way, finish with a professional alignment, and your leveled truck will drive straight and wear its tires evenly.



Leave a comment